Alright, the root canal itself is over. While the procedure is designed to get you out of pain, it's completely normal to feel some tenderness and sensitivity once the numbness starts to fade. Don't worry, this isn't a red flag; it's just your body's natural response to the work that was done. Think of it as the healing process kicking into gear.
The first couple of days are all about managing this initial tenderness and setting yourself up for a smooth recovery. A few smart, simple steps can make all the difference in your comfort.
Your First 48 Hours Post-Root Canal

The key to a comfortable recovery is to be proactive, not reactive. Don't wait for a throbbing ache to settle in before you do something about it.
Get Ahead of the Discomfort
The best advice we give our patients is to take an over-the-counter anti-inflammatory, like ibuprofen, before the local anesthetic has a chance to wear off completely. This simple step helps manage inflammation right from the start, which is the main source of post-procedure discomfort.
It’s actually quite common to feel a dull ache; studies show this affects about 40% of patients in the first 24 hours. The good news? That number plummets to just 11% after a week. For most people, that initial ache is easily managed with NSAIDs.
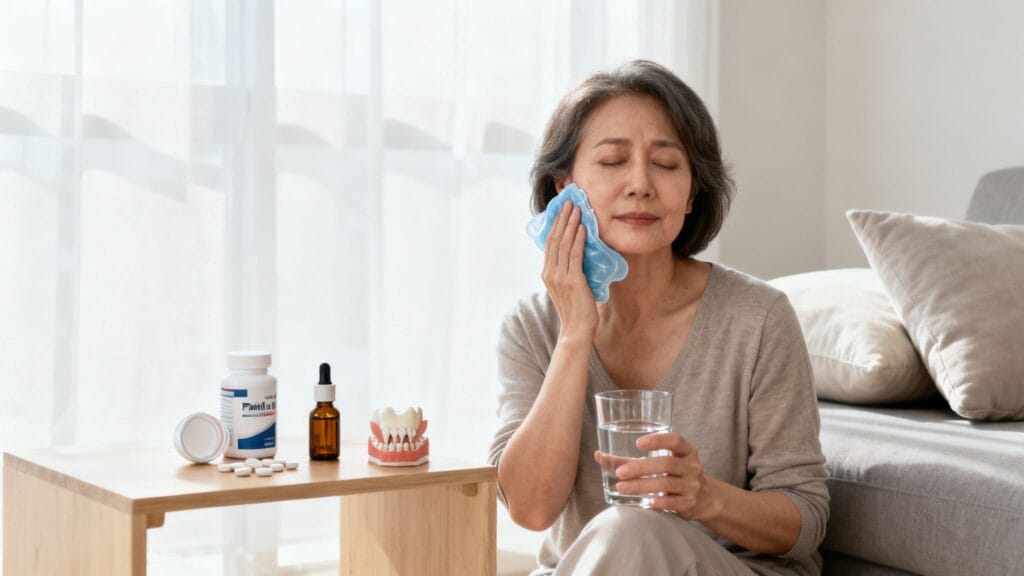
At our Clairemont Mesa and La Jolla area practice, we always recommend pairing medication with a cold compress. Applying an ice pack for 15 minutes on, 15 minutes off can reduce swelling by 20-30% in that first critical day. It’s a powerful, drug-free way to find relief.
The Power of Cold and Elevation
Beyond medication, two old-school tricks work wonders for managing swelling and that pulsing sensation:
- Apply a Cold Compress: Grab an ice pack or even a bag of frozen veggies, wrap it in a towel, and hold it against your cheek near the treated tooth. The cold constricts blood vessels, which directly reduces swelling and provides a nice, numbing feeling.
- Elevate Your Head: Lying flat can increase blood pressure in your head, making any throbbing feel more intense. When you rest or go to sleep, prop your head up with an extra pillow. Gravity will become your friend, helping to reduce pressure and discomfort in the area.
Post-procedure care isn't just about dulling pain; it's about actively helping your body heal. Every small step you take in these first 48 hours contributes to a faster, more comfortable recovery.
Be Gentle With Your Mouth
For the first couple of days, your tooth is still sensitive and protected by a temporary filling. You’ll want to treat it with care to avoid any irritation or damage.
Avoid chewing on the side of your mouth where the root canal was performed. Stick to a soft food diet—think smoothies, yogurt, mashed potatoes, or lukewarm soups. Stay away from anything hard, crunchy, or sticky that could put too much force on the tooth.
You can and should keep up with your oral hygiene, but be gentle. Brush and floss your other teeth as you normally would, but take it easy around the site of the root canal. Many of these aftercare tips are similar to what you should do after a tooth removal.
To help you know what to expect, here is a quick reference guide for the first week of recovery.
Post-Root Canal Pain Management Timeline: What to Expect
| Timeframe | Expected Sensation | Recommended Action |
|---|---|---|
| Day 1-2 | Dull ache, tenderness, and mild swelling are common. Pain is most noticeable as anesthesia wears off. | Take anti-inflammatories before numbness fades. Use a cold compress (15 min on/off). Elevate your head. Eat soft foods. |
| Day 3-4 | Discomfort should noticeably decrease. Tenderness may still be present, especially when biting. | Continue with OTC pain relievers as needed. You can start reintroducing slightly firmer foods, but continue to avoid chewing on the treated tooth. |
| Day 5-7 | Pain should be minimal to non-existent. You might feel a slight "different" sensation in the tooth, but not pain. | Discontinue pain medication. Resume normal brushing and flossing with care around the temporary filling. |
This timeline represents a typical recovery. Remember, everyone heals differently, but significant or worsening pain is not part of the standard process.
Using Pain Medication Safely and Effectively

When it comes to managing pain after a root canal, the best strategy is to be proactive. Our philosophy has always been to stay ahead of the pain, not wait until it’s become a problem. With the right over-the-counter medications, you can keep discomfort to a minimum.
The two workhorses here are Non-Steroidal Anti-Inflammatory Drugs (NSAIDs) like ibuprofen (Advil, Motrin) and a simple pain reliever, acetaminophen (Tylenol). They tackle pain from two different angles, which is why they work so well together.
NSAIDs vs. Acetaminophen
Think of NSAIDs as your inflammation fighters. They go right to the source of the discomfort—the swelling in the tissues around your tooth—to reduce that throbbing, tender feeling. This is what provides the deep relief from post-procedure aches.
Acetaminophen takes a different route. Instead of targeting inflammation directly, it works with your brain to change how you perceive pain signals. It’s like turning down the volume on your body's pain notifications.
Because they work on separate pathways, we often recommend a combination strategy to get the best of both worlds.
The Alternating Strategy
One of the most effective ways to manage post-root canal pain is by alternating between ibuprofen and acetaminophen. This creates overlapping coverage, so as one medication starts to wear off, the other is already working. It's how we keep pain from ever getting a real foothold.
Here's a sample schedule that works well for many adults. Always remember to follow the specific dosage instructions from your dentist or what’s on the medication label.
- Noon: Take a dose of ibuprofen (e.g., 400-600 mg).
- 3:00 PM: Take a dose of acetaminophen (e.g., 500-1000 mg).
- 6:00 PM: Take your next dose of ibuprofen.
- 9:00 PM: Take your next dose of acetaminophen.
This routine gives you a three-hour gap between different medications and a full six hours between doses of the same one. We always tell our patients to set alarms on their phones for the first 24-48 hours—it makes staying on schedule effortless. For more on proper use, it’s always a good idea to review general medication safety information.
This alternating approach allows you to achieve superior pain control with lower overall doses of each drug, which is much gentler on your system.
The data backs this up. Research shows that for post-procedure discomfort, NSAIDs can achieve an 85-90% reduction in pain within just a few hours. In fact, one study found that 89% of patients were comfortable by the end of the first week, with only a tiny fraction (5%) ever reporting severe pain.
When Prescription Medication Is Needed
If your root canal was needed due to a particularly severe infection, we might send you home with a prescription for something stronger. If that’s the case, it is absolutely essential to take it exactly as prescribed.
Never mix prescription pain relievers with other medications unless we’ve specifically instructed you to do so. And please, never take more than the recommended dose or share your prescription. If you have any questions at all, a quick call to our San Diego office is all it takes to get the answers you need.
Smart Eating and Gentle Oral Hygiene for Recovery

Pain management after a root canal goes beyond just taking a pill. What you choose to eat and how you care for your mouth are just as crucial for a comfortable and quick recovery. We always tell our patients to think of their tooth as being on a strict but temporary "bed rest." Your job is to nourish your body without bothering the healing area.
For the first few days, stick to a diet of soft, easy-to-eat foods. This is non-negotiable. It protects the temporary filling we place and, more importantly, prevents you from putting pressure on a tooth that's already been through a lot.
Your Post-Root Canal Grocery List
To make life easier, here’s a quick rundown of foods that will keep you satisfied without risking any pain. The theme here is simple: minimal to no chewing required.
Comforting and Safe Food Choices:
- Dairy: Creamy yogurt, cottage cheese, and other soft cheeses are excellent.
- Fruits and Veggies: Think smoothies (just avoid fruits with tiny seeds), applesauce, mashed potatoes, and any vegetables cooked until they're completely soft.
- Proteins: Scrambled eggs, protein shakes, and flaky fish like tilapia or salmon are gentle and nutritious.
- Grains and Soups: You can't go wrong with oatmeal, cream of wheat, and lukewarm soups or broths.
Knowing what not to eat is equally important. Chewing on the side of your root canal is off-limits for at least a few days. And certain food textures are a recipe for a painful setback.
Foods You Must Avoid
Some foods are practically designed to cause trouble after a root canal. They can pull out a temporary filling or create just enough force to irritate the sensitive tissues underneath, causing a flare-up.
Temporarily Off the Menu:
- Hard Foods: Nuts, hard candies, ice, and even raw veggies like carrots.
- Crunchy Foods: Say no to chips, popcorn, and pretzels for now.
- Sticky Foods: Gummy candies, caramel, and taffy are notorious for pulling on dental work.
- Extreme Temps: Anything piping hot or ice-cold can trigger sensitivity in the surrounding area.
Following a soft-food diet for a few days can make a world of difference in your comfort level. It’s one of the simplest and most effective ways to relieve pain after a root canal.
Think of your temporary filling as a protective shield. Your primary job is to avoid anything that could challenge or displace it before your dentist places the permanent crown.
Once you have your menu planned, the next piece of the puzzle is oral hygiene. Keeping the area clean is vital for preventing infection, but being too aggressive can set your healing back.
How to Clean Your Mouth Without Causing Pain
This is all about finding a gentle touch. You need to keep bacteria away from the site without aggravating the tender gums and tissues around your treated tooth.
Don't stop brushing and flossing! Just adjust your technique. Brush and floss all your other teeth as you normally would. When you get to the tooth that had the root canal, switch to slow, delicate strokes. The goal is to clean the tooth without putting any real pressure on that temporary filling.
Another classic home remedy that really works is a simple salt-water rinse. It’s a natural way to disinfect, soothe irritation, and help reduce any swelling.
Salt-Water Rinse Instructions:
We recommend this simple rinse to all our post-procedure patients. Just be sure to wait at least 24 hours after your root canal before you start.
- Mix a half-teaspoon of regular table salt into an eight-ounce glass of warm water. Make sure it's warm, not hot.
- Gently swish the solution in your mouth for about 30 seconds.
- Carefully spit it out—no vigorous spitting that could create pressure.
You can do this rinse three to four times a day, especially after you eat. It helps flush away any lingering food debris and creates a clean environment that lets your body heal faster.
Natural Remedies and Lifestyle Adjustments for Healing
Okay, you’ve made it through the root canal. Now what? Beyond the pain medication your dentist recommended, there are several simple, smart things you can do at home to manage discomfort and speed up your recovery. Think of these as ways to support your body's own healing process.
The Power of Elevation and Hydration
Ever notice how a toothache seems to get worse the second you lie down for the night? That throbbing isn't your imagination. When you're flat on your back, blood pressure increases in your head, which can put extra pressure on the sensitive, healing tissues around your tooth.
The fix is surprisingly easy: elevate your head while you sleep. Just grab an extra pillow or two to prop yourself up. This simple change uses gravity to your advantage, helping to calm that pulsing sensation so you can get some much-needed rest.
And don't forget to keep your water bottle handy. Staying well-hydrated is key to just about every healing process in the body, helping to flush out inflammation. Getting dehydrated will only slow things down.
Harnessing Natural Analgesics
For a bit of targeted relief, some natural remedies can be surprisingly effective. Clove oil is a classic for a reason—it contains eugenol, a natural anesthetic that has been used in dentistry for a very long time.
If you decide to try it, just be sure to use it correctly.
- Dilute It: Pure clove oil is too strong for your gums and can cause irritation. Put just two drops on a clean cotton ball or swab.
- Apply Gently: Lightly dab the cotton onto the gums next to the sore tooth, not directly on it or in the tooth itself.
- Use Sparingly: Think of this as a temporary fix to take the edge off, not a replacement for proper dental care.
This flowchart can help you decide what to do based on the kind of ache you're feeling.

If you're curious about other ways to handle discomfort at home, our guide on tooth pain home remedies has some more great tips.
Combining these natural approaches with your dentist's aftercare instructions creates a supportive environment for healing. Small adjustments, like how you sleep and what you drink, can have a surprisingly large impact on your overall comfort.
Lifestyle Choices That Impact Healing
How you live your life for the first few days after your procedure really matters. Two of the most important things to avoid are alcohol and smoking, as both can seriously get in the way of healing.
Alcohol thins your blood, which can lead to more bleeding and swelling at the treatment site. It also dehydrates you. It's really best to steer clear of it for at least the first 48-72 hours.
Smoking and Vaping are even more problematic. The hundreds of chemicals in tobacco and vape smoke directly interfere with your body's ability to heal and significantly raise your risk of infection. On top of that, the physical act of sucking can dislodge the temporary filling, which is a painful problem you definitely want to avoid. The longer you can go without smoking, the better your odds of a smooth recovery.
Taking these simple, natural steps can greatly relieve pain after a root canal. And if you're looking for ways to manage discomfort and stress more broadly, you might find some interesting ideas in articles that explore things like the Shakti Mat Benefits for Pain, Sleep, and Stress. By being mindful of your habits, you can play an active role in your own healing.
Recognizing Red Flags and When to Call Your Dentist
You’ve made it through the root canal—great job. While most of the healing process is straightforward, it’s completely normal to wonder, "Is what I'm feeling okay?" Knowing the difference between typical post-procedure discomfort and a genuine red flag is key to a smooth recovery and gives you peace of mind.
The whole point of a root canal treatment in San Diego is to resolve pain, not create more of it. So, while some initial tenderness is expected, anything that feels severe or is actively getting worse is a sign that you should reach out. As a rule of thumb, we always tell our patients it's better to call us and find out it's nothing to worry about than to wait and let a small issue potentially become a bigger problem.
Pain That Gets Worse, Not Better
This is probably the most important signal to pay attention to. Your pain should follow a clear downward trend. After the first 48 to 72 hours, you should notice a definite improvement. If your pain suddenly ramps up, starts throbbing intensely, or just isn't touched by over-the-counter pain relievers after day three, it’s time to pick up the phone.
Pain that escalates like this could point to a few things we'd want to check out, such as a stubborn infection that needs more attention, persistent inflammation, or even a tricky, hidden canal in the tooth's root system that we need to address.
Trust your gut. A dull, fading ache is part of the healing playbook. Sharp, throbbing pain that gets worse is your body telling you something isn't right.
Swelling, Fever, or Other Signs of Infection
A little bit of puffiness in your cheek on day one is pretty common. But if you see swelling inside your mouth, or notice facial swelling that’s spreading, feels hard, or is warm to the touch, that’s a different story. That warrants an immediate call.
There are a few other clear signs that an infection might be brewing. Don't ignore these:
- A "Pimple" on Your Gum: If you spot a small, pimple-like bump near the tooth we worked on, that's often an abscess trying to drain.
- Running a Fever: A fever is a classic sign that your body is fighting off an infection and it’s not something to brush off after a dental procedure.
- A Bad Taste or Odor: A foul taste or smell that won't go away can also signal an underlying infection that needs to be handled.
If you experience any of these, especially together, please contact us. For our patients in Clairemont Mesa, La Jolla, and the surrounding areas, we make it a priority to see you quickly to get things back on track.
Issues With the Filling or Your Bite
That temporary filling we placed is crucial—it’s protecting the treated tooth from bacteria and damage until you get your permanent crown. If it feels loose, cracks, or falls out entirely, the tooth is exposed. Call your dentist right away to get it replaced.
You should also pay close attention to your bite once the anesthesia wears off. It should feel normal. If the treated tooth feels “high” and hits before your other teeth, that constant pressure can cause a lot of pain. It’s usually a very simple fix, but it requires a quick trip to the office for an adjustment.
Symptom Checker: Normal Recovery vs. Time to Call the Dentist
To make things easier, here’s a quick guide to help you tell the difference between what’s expected and what’s a red flag.
| Symptom | What's Normal (First 3 Days) | When to Call Your Dentist |
|---|---|---|
| Pain Level | A mild to moderate dull ache that improves each day and is manageable with OTC medication. | Severe, throbbing pain that gets worse instead of better or does not respond to medication. |
| Swelling | Minor puffiness on the cheek near the treated tooth, which reduces with cold compresses. | Visible swelling inside the mouth or on the face that is spreading, firm, or getting larger. |
| Bite | The tooth might feel slightly "different," but the bite should feel even and comfortable. | The treated tooth feels "high" when you bite down, or there is sharp pain upon biting. |
| General Health | Feeling well, with no systemic symptoms. | Developing a fever, a bad taste in your mouth, or an overall feeling of being unwell. |
Ultimately, you know your body best. This chart is a helpful reference, but if you're ever concerned or feel that something just isn't right, don't hesitate to contact Serena San Diego Dentist. We're here to help.
Common Questions We Hear After a Root Canal
Even after we’ve walked you through the recovery process, it's completely normal for more questions to pop up once you're back home. We get it. At Serena San Diego Dentist, we want you to feel confident and at ease, so we’ve put together answers to some of the most common questions our patients ask.
How Long Will the Pain Actually Last After My Root Canal?
This is always the first question, and for good reason. For most people, any real discomfort is gone within the first 24 to 72 hours. What you’ll likely feel is a dull, background ache or some sensitivity right around the tooth we worked on. This is perfectly normal—it’s just your body healing the inflamed tissue that was causing the problem in the first place.
That initial soreness can almost always be handled with the schedule of over-the-counter pain relievers we discussed. After those first couple of days, you should notice the feeling fading steadily. If the pain feels severe, doesn't get better, or starts getting worse after day three, that's a clear signal to give our office a call.
Can I Go Back to Work the Day After My Root Canal?
Absolutely. The vast majority of our patients head right back to work or school the very next day. While you might feel some minor soreness, the procedure itself doesn't require you to be on bed rest.
That said, it’s a good idea to stick to softer foods for a day and maybe skip that high-intensity workout. The best advice is always to just listen to your body. If you feel like you need to take it easy, do. But for most, life goes on as usual.
Why Does My Tooth Hurt More When I Lie Down at Night?
Many people notice this, and it’s not your imagination. It comes down to simple physics. When you lie down flat, blood pressure naturally increases in your head, which can create a pulsing or throbbing feeling in the healing tissues around your tooth.
The fix is surprisingly simple: try sleeping with your head propped up on an extra pillow or two. Elevating your head uses gravity to reduce that pressure, often making for a much more comfortable night's sleep.
This one small adjustment can make a world of difference in how you relieve pain after a root canal, especially during those first couple of nights.
Is It Normal for My Jaw to Be Sore?
Yes, a little bit of jaw soreness is very common. The important thing to know is that this discomfort isn’t from the tooth itself, but simply from having your mouth open during the procedure. Think of it as muscle fatigue after holding a pose for a while.
The soreness is temporary and usually goes away in a day or two. You can ease it by gently massaging the jaw muscles or applying a warm, moist compress to the area to help everything relax.
As your tooth heals, don't forget that the final step is usually a permanent restoration. In most cases, this means placing a protective crown over the tooth. If you're curious about what that involves, our guide on tooth crowns after a root canal has a lot of helpful details. Our goal is to make sure your tooth is not only pain-free but also strong enough to last for years.
At Serena San Diego Dentist, your comfort is our top priority, from the moment you sit in the chair to your full recovery. If you have any other questions or just feel like something isn't right, please don't hesitate to reach out.
Schedule your consultation or follow-up appointment with our expert team today!