When you decide to get a dental crown, you're not just signing up for a single procedure; you're starting a journey to restore a tooth's strength and appearance. Many of our patients in sunny San Diego are curious about what that journey actually looks like from start to finish. Worried about pain or the time involved? Let's walk through it together.
Think of it as a carefully mapped-out process with several key stages. It’s a true collaboration between you, your dentist, and the lab technicians who will craft your new tooth. The goal is always the same: to create a final restoration that fits perfectly, feels natural, and looks fantastic in your smile.
Your Dental Crown Journey: From Start to Finish
Let's walk through what you can expect, from the first time you sit in the chair to discuss the crown to the moment you walk out with your new, permanent tooth.
The Initial Consultation and Planning
The very first appointment is all about discovery and planning. This is where we lay the groundwork and make sure a crown is truly the best path forward for you. It's less about treatment and more about conversation and assessment.
Here’s what typically happens during this visit:
- A Detailed Look: We'll conduct a thorough exam of the tooth in question. This often includes taking X-rays to get a clear picture of the root's health and the condition of the bone underneath.
- Exploring Your Options: Not all crowns are created equal. We'll talk through the different materials like porcelain, zirconia, or ceramic. We'll discuss the pros and cons of each, considering where the tooth is in your mouth and what you want it to look like.
- Getting Your Questions Answered: This is your time. We encourage you to ask anything and everything, whether it's about the procedure itself, comfort levels, or the financial side of things.
This initial sit-down usually takes about 30 to 60 minutes. It's a crucial step to ensure we have a solid, personalized plan tailored just for you. To get a feel for how we structure our appointments, you can read more about what to expect during a typical dental visit.
The graphic below shows the streamlined initial steps we take here at Serena San Diego Dentist to get your crown procedure underway.
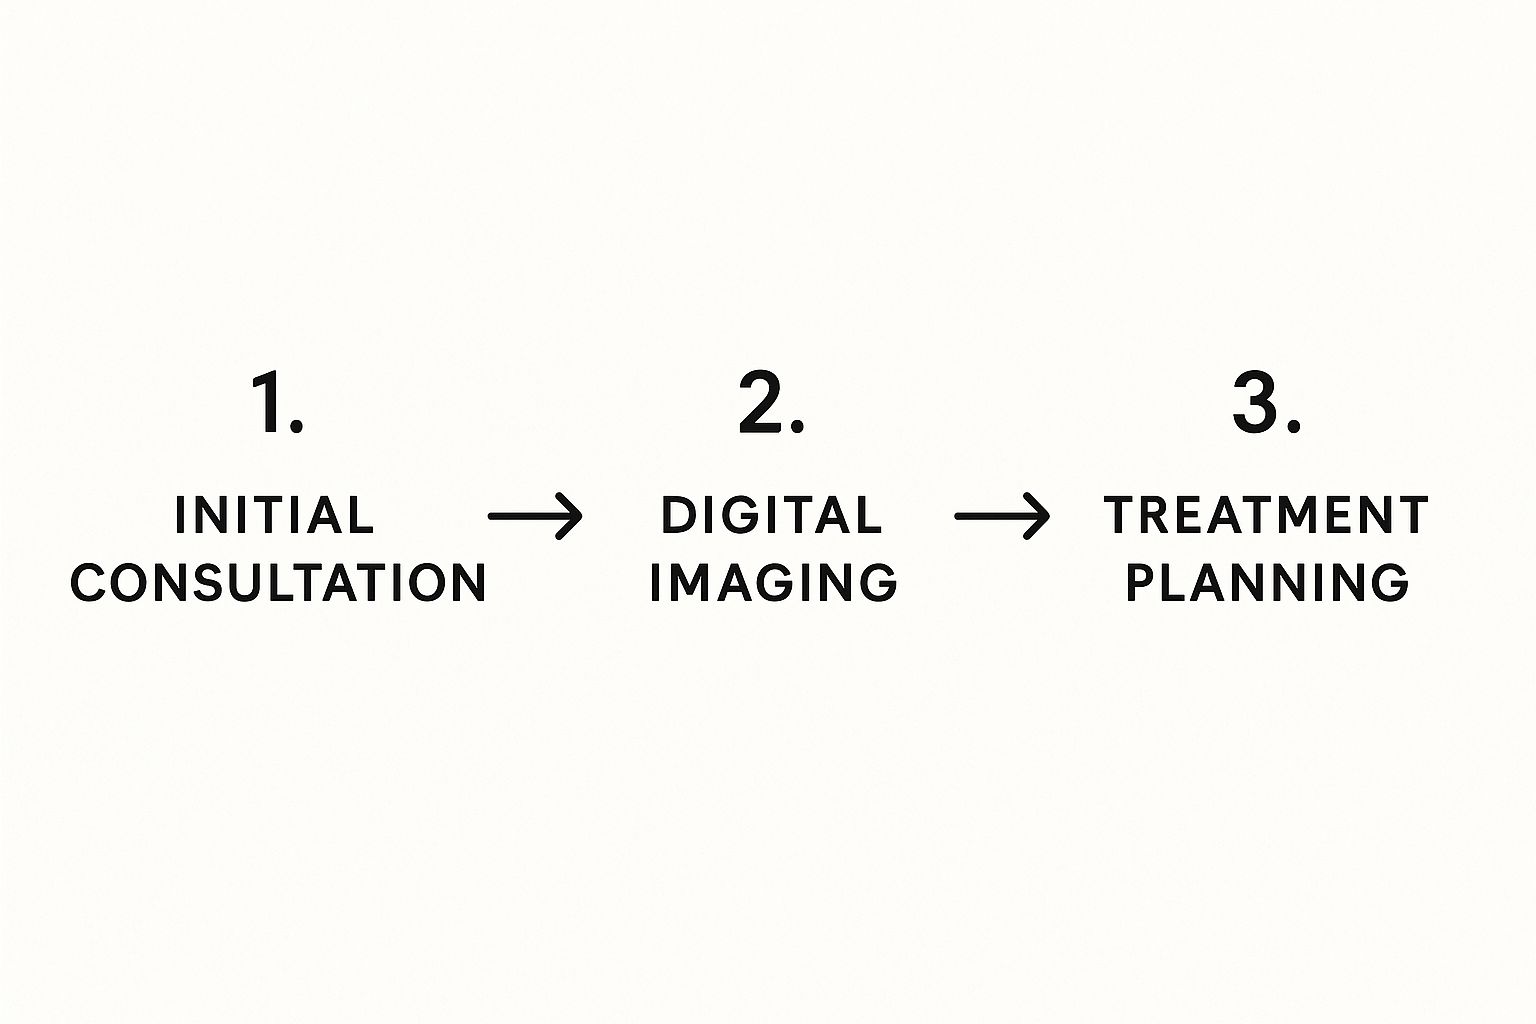
As you can see, we move logically from that first conversation to a fully fleshed-out treatment plan. This methodical approach ensures there are no surprises and sets us up for a smooth and successful outcome.
Dental Crown Procedure at a Glance
To give you a clearer picture, here is a quick summary of the typical stages, what happens, and the approximate time commitment for each part of the dental crown process.
| Procedure Stage | What Happens During This Step | Typical Duration |
|---|---|---|
| Initial Consultation | Examination, X-rays, discussion of materials, and creating a treatment plan. | 30-60 minutes |
| Tooth Preparation & Impression | The tooth is reshaped, and a digital or physical impression is taken. A temporary crown is placed. | 60-90 minutes |
| Crown Fabrication | A dental lab uses the impression to custom-craft your permanent crown. | 1-2 weeks |
| Permanent Crown Placement | The temporary crown is removed, and the permanent crown is fitted, adjusted, and cemented. | 30-60 minutes |
This table helps break down the journey into manageable steps. While every patient's timeline is slightly different, this gives you a great idea of what to expect.
Preparing Your Tooth for Its New Crown
This first major appointment is where we really get down to business. The whole focus of this visit is to create a solid, stable foundation for your new crown. Getting this part right is crucial for ensuring a perfect fit and a restoration that will stand the test of time. It’s a very precise process, but we’ve honed our technique to make sure you're comfortable from start to finish.
First things first, we'll apply a local anesthetic to completely numb the tooth and the gum tissue around it. Your comfort is our top priority, and we want this to be an entirely pain-free experience. If you're nervous about needles, you're not alone. We use modern techniques for painless injections that truly make a world of difference.
Reshaping the Tooth
Once the area is fully numb, we get to work on the tooth itself. This starts with clearing out any decay, removing old fillings, and addressing any fractured or weak parts. We need a clean, healthy slate before we can move on.
With the tooth prepped, we begin the reshaping. This is probably the most technically demanding part of the whole procedure, as the final fit and appearance of your crown depend entirely on it. We carefully sculpt the tooth, filing it down to create the perfect shape for the crown to sit on. The goal is to reduce it just enough—usually between 0.3 mm and 1.5 mm—to make room for the crown material without it feeling bulky or out of place in your bite.
Capturing the Perfect Impression
After shaping the tooth, we need an exact replica of it to send to the dental lab. This model is the blueprint they'll use to fabricate your custom-fit crown. To guarantee precision, we rely on advanced methods.
Essentially, there are two ways we can do this:
- Traditional Putty Molds: The classic approach involves having you bite into a tray of soft, putty-like material. It sets in a minute or two, creating a detailed physical impression.
- 3D Digital Scans: A more modern technique uses a small intraoral scanner, like a little wand, to capture thousands of pictures of your tooth. A computer then stitches these images together to create a remarkably accurate 3D model.
Digital Scanning Advantage: I'm a huge fan of 3D digital scans. They're not just faster and more comfortable for you (no goopy trays!), but the level of accuracy is incredible. This precision means the lab can create a crown that often requires little to no adjustment when you come back for your final fitting.
Protecting Your Tooth with a Temporary Crown
You won’t be leaving the office with a vulnerable, prepared tooth. The last thing we do in this appointment is fit you with a temporary crown. We make this right here in the office, and it’s designed to cover and protect the tooth while your permanent one is being made.
This temporary crown does a few important jobs:
- It protects the prepared tooth from sensitivity and potential damage.
- It lets you eat, talk, and smile normally.
- It holds the correct spacing between your teeth, preventing them from shifting.
- It gives you a good idea of what your final crown will look and feel like.
We'll secure this temporary restoration with a gentle cement—strong enough to keep it in place, but easy enough for us to remove at your next visit. You'll walk out of our office ready to carry on with your day, while our trusted lab partners begin crafting your beautiful, permanent crown.
How Your Custom Dental Crown Is Made
Once we’ve prepared your tooth and taken those detailed impressions, the action moves from our dental chair to a specialized lab. This is where the real magic happens, as a skilled dental technician—part artist, part scientist—takes our blueprint and begins crafting your permanent crown.
The traditional method for making crowns is a time-tested process that delivers phenomenal results. The technician uses the impression we sent to build a perfect model of your bite. From there, they meticulously layer materials like porcelain or ceramic, paying incredibly close attention to the shade and translucency. Their goal is to create a crown that doesn't just fit perfectly but also vanishes into your smile, looking just like a natural tooth.
The Traditional Laboratory Process
Creating a crown in a lab is a fascinating, multi-step journey. It’s all about precision. Here’s a quick peek behind the curtain at what that process typically involves:
- Creating the Model: The first step is turning our impression or digital scan into a physical, exact duplicate of your prepared tooth.
- The Wax-Up: A technician then sculpts the ideal crown shape out of wax, right on top of the model. They hand-carve every tiny ridge and groove to ensure it will function perfectly.
- Building the Crown: Depending on the material chosen, the wax-up is either used to cast a metal substructure or serves as a guide for hand-layering porcelain to get the color just right.
- Finishing Touches: Finally, the crown is polished and glazed to give it that natural, lifelike sheen before it’s carefully packaged and sent back to our office.
In the past, this whole process meant you'd be waiting two to three weeks for your final crown. But things have changed quite a bit in modern dentistry.
The Rise of Same-Day CEREC Technology
For many of our patients, waiting weeks for a new crown just isn't ideal. Thankfully, technology offers a fantastic alternative: CEREC (Chairside Economical Restoration of Esthetic Ceramics). This system allows us to design, create, and place your permanent crown all in one appointment.
No more goopy impressions, no temporary crown, and no need to schedule a second visit. We can take you from a prepared tooth to a final, beautiful ceramic crown in just a couple of hours right here in our office.
We use the same highly accurate 3D digital scans to design your crown on a computer while you wait. Once the design is perfect, we send the file to our in-office milling unit. This machine then precisely carves your new crown from a solid block of high-strength, tooth-colored ceramic. It’s an amazing blend of convenience and quality.
If you’re curious about this single-visit option, you can learn more about CEREC crowns and find out if it’s the right fit for your situation.
The Big Day: Getting Your Permanent Crown Seated
This is the appointment you’ve been looking forward to. After wearing a temporary crown for a week or two, you’ll come back to have your permanent, custom-made crown put in its final place. It’s an exciting visit where all the prep work pays off and your smile is fully restored.
We start by gently removing the temporary crown. Don't worry, it's designed to come off easily since it was only held on with a weaker, temporary cement. Once it’s off, we’ll completely clean the tooth underneath, making sure no temporary adhesive is left behind and the surface is perfectly prepped.
Making Sure the Fit and Feel Are Perfect
Now for the main event: we'll carefully place your new crown on the prepared tooth for a "try-in." This is a crucial step, and we take our time here. We're looking for perfection before we permanently bond it, because a great fit is what guarantees a comfortable, long-lasting restoration.
Here’s exactly what we’re checking during this meticulous fitting:
- The Fit: We examine the edges of the crown—the margins—to make sure they sit flush against your tooth. A seamless, gap-free fit is non-negotiable for keeping bacteria out.
- The Bite: We’ll have you bite down on a thin piece of articulating paper. This special paper leaves tiny color marks that show us exactly how your teeth are meeting. If the crown is even a little too high, we’ll know, and we can adjust it for a comfortable bite.
- The Color: We'll compare the crown to your other teeth using a shade guide and natural light. Our goal is a perfect match, so the crown blends in so well that no one can tell it’s not your natural tooth.
This is a collaborative process. We’ll make tiny, precise adjustments until the crown feels just right to you and looks perfect to us. Your feedback is everything at this stage.
Bonding Your New Crown for the Long Haul
Once we’ve confirmed the fit, function, and aesthetics are spot-on, it’s time to secure it for good. We'll apply a powerful dental cement inside the crown and then firmly seat it onto your tooth. This professional-grade adhesive creates an incredibly durable bond, sealing the tooth from potential decay and locking the crown in place for years to come.
Fun fact: We often use a special curing light to harden the cement in seconds. This light activates chemicals in the bonding agent, creating a rock-solid seal between the crown and your tooth right then and there.
After a final polish to smooth away any excess cement, that's it! You're all done. You’ll leave our office with a strong, beautiful, and fully functional tooth that completes the dental crown procedure steps and restores your smile.
Caring for Your New Dental Crown
You’ve made a great investment in your smile, and the good news is that taking care of your new crown is simpler than you might think. With the right habits, that crown can easily last for over a decade. The final part of your journey is simply folding its care into your everyday routine, much like you would for any other tooth.
The first day or two are the most critical. We always advise patients to steer clear of anything overly sticky or hard for the first 24-48 hours. This little bit of patience gives the dental cement the time it needs to fully set and create an ironclad bond with your tooth.
Your Daily Oral Hygiene Routine
Consistency is everything when it comes to making your crown last. The spot that needs the most attention is what we call the "margin"—it's that tiny, almost invisible line where the bottom of the crown meets your natural tooth, right at the gum line. This area can be a magnet for plaque if you're not careful.
Here's how to keep that margin clean and healthy:
- Brush with a Gentle Touch: Grab a soft-bristled toothbrush and use a non-abrasive toothpaste. The key is to angle the bristles right where the crown meets the gums and use small, circular motions.
- Don't Skip the Floss: Flossing around a crown is absolutely essential. Gently guide the floss between the teeth, then curve it into a "C" shape against the side of the crown. Slide it up and down a few times. Pro tip: Instead of popping the floss back up, pull it out through the side. This prevents any chance of snagging the crown's edge.
We often tell our patients to think of their crown as a natural tooth that just happens to have a protective helmet. You still need to clean the foundation it rests on to prevent gum disease and decay.
If you want to brush up on the basics, we put together a guide with some great tips to step up your oral hygiene that works perfectly for natural teeth and crowns alike.
Smart Habits for Crown Longevity
Beyond your daily cleaning, a few small lifestyle tweaks can go a long way in protecting your crown from damage. Today's crowns are incredibly strong, but they aren't invincible.
Think about making these minor adjustments:
- Avoid Chewing Ice: This is a tough one for many people, but chewing ice puts immense, sharp pressure on teeth and can easily chip or crack a porcelain crown.
- Watch Out for Hard Foods: Be mindful when eating things like hard candies, un-popped popcorn kernels, or nut shells. Try to avoid biting down directly on them with your crowned tooth.
- Wear a Nightguard if You Grind: If you know you clench or grind your teeth at night (a condition called bruxism), a custom nightguard is your crown's best friend. It acts as a protective cushion, absorbing forces that could otherwise fracture your new restoration.
Lastly, nothing beats regular dental check-ups. Coming in for your routine cleanings and exams lets us keep a close eye on your crown. We'll check the margins for any potential issues and make sure the tooth underneath is staying healthy, catching small problems before they become big ones.
Got Questions About Getting a Dental Crown? We’ve Got Answers.
It’s completely normal to have a lot of questions before committing to a dental crown. Feeling informed is the first step toward feeling comfortable, so I've put together answers to the most common things patients ask me here in our San Diego office. My goal is to clear up any confusion so you know exactly what to expect.
https://www.youtube.com/embed/dSBwK3Op4ig
Does Getting a Crown Hurt?
This is usually the very first question people ask, and the answer is simple: the procedure itself should not be painful. Before we do anything, we use local anesthesia to make sure the tooth and the entire area around it are completely numb.
You might feel a bit of pressure or notice the vibration from our tools while we're shaping the tooth, but you won't feel pain. Once the numbness wears off after that first visit, it's common to have some minor sensitivity for a day or two. This is usually very mild and easily handled with standard over-the-counter pain relievers.
How Long Does a Dental Crown Actually Last?
The lifespan of a crown can really vary, but on average, you can expect it to last somewhere between 5 and 15 years. If you take fantastic care of it with great oral hygiene and regular check-ups, it’s not unheard of for a crown to last much longer.
A few key things play into how long your crown will hold up:
- The Material It's Made From: Some materials, like zirconia or certain metal alloys, are incredibly tough and are great choices for back teeth that do all the heavy lifting (chewing).
- Your Oral Hygiene Habits: Brushing and flossing are non-negotiable. Keeping the area where the crown meets your gum line clean is critical for preventing decay that could undermine the whole restoration.
- Your Personal Habits: Things like grinding your teeth at night (we call this bruxism) or chewing on hard things like ice or pen caps can dramatically shorten a crown's life.
Coming in for regular dental visits lets us keep an eye on your crown and catch any small problems before they become big ones.
A crown's durability often depends as much on the patient's care as it does on the material it's made from. It's a true partnership between you and your dental team.
Can I Eat Normally with a Temporary Crown On?
Yes, you can eat, but you’ll want to be a bit mindful for a week or two. Your temporary crown is placed with a much weaker dental cement. We do this on purpose so that it’s easy for us to remove when your permanent one is ready.
Because of this, we recommend avoiding chewing directly on the temporary crown if you can. It’s also a smart idea to steer clear of certain foods that could cause trouble:
- Sticky Stuff: Think caramel, gummy candies, or chewing gum. These can grab onto the temporary and pull it right off.
- Hard Foods: Nuts, hard candy, and ice are the biggest culprits for cracking a temporary crown.
- Chewy Things: Really tough breads or steak can put more stress on the temporary than it’s designed to handle.
Simply cutting your food into smaller bites can make a big difference. Remember, these precautions are just for a short while.
Insurance and Payment Options
We believe high-quality dental care should be accessible. At Serena San Diego Dentist, we work with you to make treatment affordable. We accept most major PPO insurance plans for covered services like dental crowns. For those without insurance or preferring more flexibility, we also offer convenient out-of-pocket payment options, including financing plans to help spread out the cost. Our team is happy to review your benefits and provide a clear breakdown so you can make an informed decision.
While a crown is often the perfect way to save a tooth, sometimes other solutions are a better fit. You can learn more about the key differences between a dental implant vs a crown in our detailed guide, which can help you understand all the options for restoring your smile.
Ready to take the next step toward a healthier, more confident smile? The team at Serena San Diego Dentist is here to answer all your questions and guide you through the dental crown process. Schedule your consultation today!